PVC is the most versatile polymer material. Its distinguishing feature is the highest environmental friendliness. Because many choose such PVC panels for modern interior decoration. The advantages of the panels include:
- Wear resistance.
- Durability.
- Absolute ease of installation.
- Resistance to any mechanical action.
- Increased moisture resistance.
- High fire resistance.
- No harmful fumes during operation.
- Low price.
- Huge selection of colors.
- Excellent heat and sound insulation performance.

However, the main advantage of PVC plastic panels is their high safety. Such boards for decoration and their components are manufactured strictly according to GOST (19111-2001). Wall panels made of polyvinyl chloride can be used for practical interior decoration of any premises: offices, garages, hospitals, houses and apartments, as well as balconies.
Using fittings for panels made of PVC
Mounting such panels is quite simple. It will be necessary to prepare in advance all the tools and necessary materials for work. So, for a quality installation you will need:
- dowels and screws,
- drill,
- hammer,
- construction level,
- construction stapler
- roulette,
- construction knife

Installation of PVC plates is impossible without the use of such additional elements:
- For the decorative completion of panel installation, a standard F-shaped profile is required.
- To close the borders at the ends of each panel, a start profile is required.
- To form a panel connection, you need to purchase a building molding. To hide the junction of the PVC panels on the floor or ceiling, you will need a floor as well as a ceiling plinth.
- Also among the required components for installation is a profile used for internal, external corners or, as an option, a soft universal corner.
- For fastening the strips, self-tapping screws or ordinary galvanized nails are used. It is important to always back off at least 5 mm from the beginning of the bar. External elements must be glued to the panels, in no case pressing down.
How to properly use components during installation
To get started, you will need to make appropriate markings on all walls. This is necessary to create on the walls a box that is needed for subsequent installation. After applying the marking, the rails are fixed when using self-tapping screws. To install the rails correctly, do not do without a building level.
The next step will be the installation of panels. Perform it is always in the direction strictly to the opening. First, an internal corner is installed, after which a panel is placed in it. Subsequent installation of all remaining panels is carried out according to the principle of "thorn groove".

Recommendations for installing PVC panels
For the proper installation of PVC panels, the following points should be considered.
- When installing the first plate, you need to measure, applying the level of its vertical position. This is important for the proper installation of all subsequent panels.
- If you need to cut off the excess part of the panel, this is done using a saw with the smallest teeth.
- For a better fit of the panels, it is important to seal them during installation.
- The extreme panel must go into the corner, or it is replaced by the end panel.
The installation process of PVC panels is quite simple. This does not require the use of any special tools. Even a beginner will cope with such work. It is important to comply with the installation technology, using only high-quality components for this. Otherwise, PVC panels will not last long.
What is pvc panel

Plastic panels - inexpensive decorative finishing material made of PVC (polyvinyl chloride) for indoor decoration. PVC specifications:
- tensile strength: 3.46MPa,
- resistance to alkalis and acids
- ignites only when temperature exceeds + 391 ° С
- in the presence of flame
- water absorption:
Pros
Today, PVC panels are the most used material for interior decoration, since this building material has many advantages:
- the price does not bite
- wide range with a variety of colors,
- strength and lightness
- moisture resistance
- antistatic coating
- easy assembly and disassembly,
- you can replace the damaged part of the structure,
- easy care.
Due to these properties, PVC is used for the production of plastic panels. The strength of plastic depends on the amount of polyvinyl chloride in its composition. The larger the PVC, the harder the plastic sheets.

Disadvantages
Long-term exposure to ultraviolet radiation, for example, in direct sunlight, on PVC products leads to photodestruction, as a result of which the product loses its elasticity and strength. To prevent this phenomenon, light-absorbing dyes are introduced into the PVC composition, which makes it possible to limit the degradation of a thin layer with a thickness of about 0.05 mm, which changes its color (the process of “bleaching”, “burnout”).
Types of Plastic Panels
In the building materials market, a huge selection of plastic panels for interior decoration is provided, which differ in size, colors, design features.
According to their application, PVC panels are divided for ceilings and walls. . Ceiling materials are more fragile and lighter than wall materials. Therefore, the ceiling of PVC panels should be mounted carefully so as not to damage them accidentally with sharp objects. Wall plastic is stronger and less flexible since it contains more PVC.
According to the type of decorative layer, PVC panels are divided into matte and glossy . The surface of the matte canvas without any coatings, so they are cheaper than glossy. Glossy canvases are coated on top with special varnishes, which additionally protect the plastic from exposure to the sun and moisture, so it is much easier to care for them.

What is PVC panel
Plastic panels vary in size: width, height and thickness. More often plastic panels are used whose width is 125 mm and 250 mm, since they are easier to install. Larger widths are less flexible, making it harder to assemble a suspended ceiling. The thickness of the panels for walls and ceilings is different. So, for the ceiling, the optimal choice would be panels with a thickness of 6 mm and 8 mmand for walls - 10 mm and 12 mm. PVC standard panels are long - 5.95 mm. In the building materials market, panels are often sold in length 3m, this suggests that they are cut into pieces.
PVC decorating methods
The presence of a pattern on a plastic canvas suggests that it was decorated. There are two ways to decorate plastic:
- Using thermal film - the pattern is transferred to the plastic surface with a hot shaft.
- High expansion direct printing - with the help of special expensive equipment. This affects the price of finished paintings. This type of plastic decoration is used to apply shades on it that mimic the color of wood, stone and fabric.

Features of PVC Ceiling Finish
When decorating the ceiling with PVC panels, only the frame method of fastening is used, which makes it possible to hide communications, as well as install any recessed lamps in the ceiling.
False ceiling design: plastic panels with fittings are mounted on profiles attached to the draft ceiling. Therefore, you can assemble such a ceiling yourself.

Metal lath for the installation of plastic panels on the ceiling in
bath
Since plastic is the lightest material for suspended ceilings, you can not be afraid that the ceiling will collapse on your head. To install plastic panels, you can use light profiles, for example, aluminum or even plastic. Such profiles can easily withstand plastic sheets and increased humidity in the room, so they can be used to install the ceiling in the bathroom. But for rooms with a normal level of humidity, you can use wooden profiles with a thickness of bars of at least 5 cm.
To make a smooth plastic ceiling, before installing the lathing, it is necessary to correctly mark the area under the suspended ceiling. To do this, measure the ceiling height in all corners of the room, starting from the side of the window, where the ceiling can be visually uneven from a lot of light. For orientation, the corner of the room is taken, where the ceiling height is the smallest. From this height 5 cm are measured down and a mark is set, which will be the level for fixing the starting profile. The resulting mark is transferred to other walls. At the marks of all the walls with the help of lacing, the level is beaten off, along which the guide profile will be fastened.
If the room will have built-in lighting, then after forming the trellis frame, immediately lay the necessary communications, and only then mount the panels.
It is possible to place panels on the ceiling in different ways, but it is best to focus on the shape of the room and lay PVC sheets perpendicular to the length of the room, such an arrangement of plastic panels will visually expand the room.
Begin the installation of plastic panels from the far corner of the room. Cloths are stacked tightly in the castle to each other.
Accessories for plastic panels
To assemble a suspended plastic ceiling, special fittings are needed. The fittings, like the PVC panels, are made according to the relevant GOST, which proves its safety in use.
To organize a plastic connection, you need such accessories:
- Starting stripe (finish) - U-shaped molding in the common people the pawn, with which they begin to lay the plastic ceiling and finish it, it closes the end of the panel. When installing plastic panels on the walls, the start profile is used to design door and window openings.
- F profile - end molding, which is used for decorative design of corner joints, as well as joints of plastic with other materials and for the design of window and door openings.


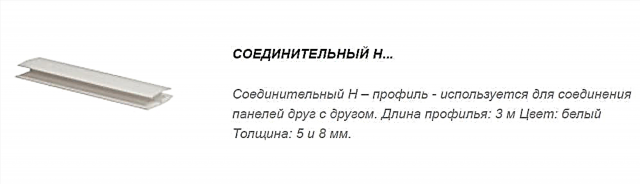
- Docking profile - H-shaped molding, serves to connect the plastic panels together in length if there is not enough length of one panel to cover the ceiling space.
- Outside corner - hides the joints of plastic sheets in the outer corners of the room.
- Inner corner - hides the connection of plastic paintings in the inner corners of the room.

- Decorative corner - A universal corner with which to close the outer joints of the paintings at a right angle.

- Universal corner - a decorative molding, which, thanks to the ability to bend at any angle, is used for both internal and external corners.

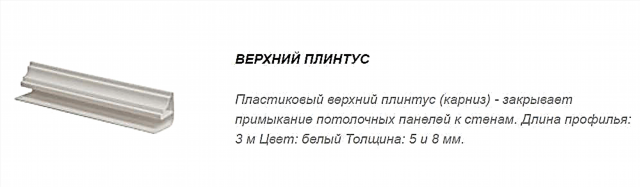
- Galtel - ceiling plinth, which helps smooth the transition from the ceiling to the walls, and also hides the joints.
- Exterior corner for ceiling plinth - hides the joints between the skirting boards in places of ledges, beams, columns.
- Interior corner for ceiling plinth - closes the joints of baseboards in the inner corners of the room.
- Connecting element for ceiling skirting boards - connects the skirting board to each other when one ceiling plinth is not enough to finish the entire length of the ceiling.

- Fixing strip - a plastic lath serves for a lathing under ceiling panels.

- Kleimers - universal parts, unlike nails, they do not damage the joints and locks of panels, fit snugly to the surface and provide high build quality.


How to use fittings during installation

Fastening panels using a plastic profile with
special clips
Accessories for PVC panels are selected according to the color of the panels themselves, as well as taking into account their thickness. At the same time, due attention should be paid to plastic fasteners so that the sheets do not fall off the ceiling over time.
A crate is made of wooden bars or a metal profile. Guide rails or profiles are attached to the base of the ceiling or wall using self-tapping screws or galvanized nails, and at least 5 cm are indented from their edge. Cross guides are installed after 30 cm. It is advisable to use a level when installing the guides.
The first panel is placed in the start profile, and then attached with self-tapping screws with a countersunk head. At the same time, make sure that the self-tapping screw does not go deep into the plastic, as it can damage the panel.
The use of moldings brings not only a decorative effect, but also strengthens the edges of the plastic structure. Therefore, when buying plastic panels, you do not need to save on accessories for installing them.
What is required?
Starting work with the formation of a ceiling from PVC panels, first of all, it is worth using the starting type of strap. This is the name of the molding in the form of the letter P, which locks the panel from the end. Similar strips are used when the panels are placed on the walls. But there they are already needed for another task - a more elegant design of door and window openings.
At the ends, a profile in the form of the letter F is necessarily put, it is needed to more beautifully file the corners and joints between PVC and other materials. Such a profile also finds application in the design of recesses under doors and windows. Docking is done using a molding similar to the letter H. It is used when you need to tie the short edges of the panels due to the fact that one of them is not long enough to cover the ceiling space.
The outer and inner corners are needed, respectively, to mask the joints at different angles. Using a universal decorative corner, you can cover the outer intersection of the paintings, converging at an angle of 90 degrees.


A universal corner can also be called such a molding, which is designed specifically for bending with an arbitrary angle. It can be used both inside and outside. A fillet is called a skirting board for a ceiling, which facilitates smoothing transitions between the ceiling and walls. A fillet is also needed to cover the joints.
Ceiling skirtings can intersect:
- on the ledges
- next to the beams
- near the columns.
In all three cases, the outer corners of a special kind are very valuable (they are called for ceiling skirting boards). Do not confuse such products with structures similar in name to the panels themselves.
Skirting corner corners help seal the intersection points at locations farthest from the entrance. Sometimes skirting boards do not have enough length, and then a special connecting element helps to solve the design problem. An important component of accessories for plastic ceilings are slats (guides), it is from them that the crate is formed.


How to choose the right one?
The selection of components primarily focuses on the color and thickness of the paintings. The strength of fastening elements is also very relevant, because they can fall off at any time. For crates, both wooden timber and steel or aluminum profiles can be used. Their fastening to the rough base is achieved through galvanized nails or self-tapping screws.
The calculation of the number of fasteners takes into account:
- approximately 50 mm away from the edge of the parts of the crate,
- the arrangement of the transverse elements approximately every 300 mm,
- all the nuances of the geometry of the created structure.


For wall panels
The lathing is formed of wooden slats, the size of which is 20x20 mm. When you plan to work in wet rooms, instead of processing wood products with solutions To protect against fungus, steel profiles with an external zinc layer can be used.
When choosing fasteners, it is taken into account that the distance between the dowel-nails holding the rails on the walls should be 50-60 cm.
The angles that help close the outer joints of the panels, going at a right angle, can have a value from 100x100 to 500x500 mm. Their choice is determined individually.
Additional information
In most kits, kleimers and other components of accessories for PVC panels are made of steel.
At the same time, there are designs from:
- magnesium alloys
- aluminum alloys
- titanium alloys.


Polymer constructions are used primarily for decorative purposes, since they are too fragile for most work. If it is not possible to select the optimal size elements, select the closest to them and cut off the excess parts with a construction knife. All additional parts for installing plastic panels must comply with GOST 19111-2001. It is required to require a certificate of conformity and carefully study it.
Choose the option by which PVC panels will be fastened, taking into account a number of considerations:
- how large is the radius of curvature of the trimmed surfaces,
- Is the humidity in the room significant?
- are there any under the communication panels
- Are temperature bridges present?


It’s cheaper and easier to fix plastic with silicone-based adhesives or “liquid nails”. But we must not forget that only formulations resistant to high temperatures are suitable. The advantages of mounting on silicone are quick drying, excellent mechanical resistance and the ability to mount panels in a short period. At the same time, the weaknesses of such a solution will be unsuitability for use on at least a minimally uneven surface and the impossibility of changing deformed panels. because in most cases, they still fasten PVC parts with nails or dowelsmaking a choice between them according to the material of the walls and ceilings.
Since the crate is often made on the basis of wooden parts, they need to be fastened with special dowels that are equipped with polymer sleeves. To strengthen the contact, it is recommended to use still liquid nails.
But you need to be prepared for the fact that you have to cut the beam and soak it with an antiseptic. Such manipulations obviously will not accelerate the construction.

Talk about installing PVC panels makes you pay close attention to kleimers. The length of such structures may vary, but usually reaches 5 cm, larger products are quite difficult to find. Mounting plates should be made of steel with a zinc layer.
Attention should be paid to the appearance and quality of the retaining tab, holes for dowels and nails. However, high-quality kleimers allow you to abandon the use of additional mounting blocks. They are much more sparing for the points of joints and panel locks, provide a tight hold to the surfaces and improve the quality of assembly.
It should be remembered that even the strongest staples leave a slight curvature that allows the walls to sag, keeping the panels intact - this is another advantage. In order for it to please the owners of the house, it is necessary to control whether the grooves with the spikes on the kleimers themselves are well connected. When the crate is mounted on a minimally uneven surface, its stability is ensured by wood linings.
You will have to make such linings yourself, because it is impossible to predict the need for them and the exact dimensions in advance. The height of the staples should be no more than 0.2 cm, using such parts is enough for 2 m in length (but if the perimeter is large, you can add more).


The selection of fittings is not the right time to save. Much more important is to take care of the manufacturability of the components used. Seemingly more expensive designs ultimately justify their price in practice.
Start profile should be:
- UV resistant
- resisting the appearance of yellowness for at least 10 years,
- flexible and non-fragile,
- containing a minimum amount of chalk and other harmful substances,
- easily mating (due to its configuration) even with partially uneven surfaces.


Based on this, plastic moldings are a big question, and in practice metal elements are of primary importance. Among them, it is worth giving preference to those parts that have a special anti-corrosion treatment. It is customary to distinguish 4 formats of profiles, according to which the values of moldings are selected. Most often, the plastic structure reaches 3 m in length. Only 0.3 cm thick profiles are 250 cm long.
The calculation of the required volume of components must be completed before installation. It should be remembered that all moldings, including corners, are sold individually. Whatever profile is installed, it is recommended to maintain a gap of 0.5 m between the individual parts. This will cover all surface defects.
When choosing adhesive mixtures, it must be borne in mind that they are always calculated for specific values of temperature, air saturation with water and other parameters.
On the ceilings, all PVC sheets are laid in profiles on three sides. The long line is oriented to the original molding. The final panel should be clamped in profiles on both sides.


All these points should be taken into account when determining the need for components. For each modification of the panels, a separate set is selected, ideally this should be done simultaneously with the purchase of facing material.
Also pay attention to the following important nuances:
- in places without openings for windows and corners, you can do with the purchase of crate profiles,
- in most outlets they offer white moldings,
- color designs are searched in special stores or even ordered,
- Of all the plastic elements, those characterized by the highest strength are preferred.
- always remember the width of the grooves for the panels,
- all parts with sharp burrs and abnormalities are not acceptable.
In the next video, you will find instructions for installing PVC panels for the ceiling and walls.
Fittings sizes. Possible colors, dimensions
Most molded PVC products have the same length of 3 m. Some of the varieties are produced in several modifications in thickness and length.
The color of the decoration elements is most often white. Manufacturers give guarantees that the plastic will not turn yellow within 1-2 decades.
Some elements may have a laminated surface and be painted in any color. Such details must be ordered by indicating the name of the decor in the catalog. Color can be:
- universal corners
- F profile
- connecting elements
- baseboards (fillet).
If the desired shade is not available, it can be ordered at the same company where the panels are purchased.
Types of accessories for finishing PVC sheets
Auxiliary parts for the installation of plastic fragments are produced in accordance with the standards of GOST 19111-2001, which indicates their quality and safety.
For assembly, different types of moldings are used.
- U-shaped profile, starting or starting - the bar with which the laying of ceiling paintings begins, it covers the transverse edges of the panels. If the product is used for walls, then with the help of it they draw up window slopes and doorways.
- The end profile in cross section resembles the letter F, and its central crossbar is advanced forward compared to the top. The part is intended for decorative framing of plastic joints, corner joints, door and window openings.


- The connecting H-shaped strip is designed to connect the short sides of the panels and increase their length when it is not enough.
- External and internal corner - details that are necessary to connect and design the outer and inner right angles.
- The corner is universal - thanks to the ability to bend at any angle it is used to close up any corners and at the same time performs the task of decorating.
- General construction angle (decorative) is necessary for sealing external joints of plastic at an angle of 90 degrees.
- The ceiling plinth (fillet) serves to smooth the transition from walls to the surface of the ceiling, covers the joints of panels.
- External and internal corners, connecting parts with its insufficient length in rooms with a large area are also required for the ceiling cornice.
- Guide rails made of plastic and galvanized steel are designed for the construction of the crate, they facilitate and accelerate the assembly of PVC panels.
Components are selected taking into account the thickness of polyvinyl chloride, a certain color of finishing paintings. And you should also pay attention to the strength of plastic fasteners, on which the reliability of the structure depends.
We carry out the installation of PVC panels. Step 1: surface preparation and materials
All materials should be purchased in advance, and not on the day of installation, because some of them are recommended to "lie down" in the room where they will be used for several days. If during delivery the panels were in contact with frost, the adaptation time of the material may increase up to a week.
Note! The room itself, if it is not heated properly, should be warmed up for several days before wall cladding and maintain a comfortable temperature in it. Sheathing should be carried out at temperatures above 10 °.
Before installing the battens on the walls, they must first be leveled with plaster and primer. Otherwise, there will be a problem when installing the crate, you will need to use studs, which will greatly complicate the work. There is no need to grind the walls.
Step 2: fixing the crate
The crate is made of a metal profile located at a distance of 30 cm from each other. It should be fixed so that the last lower profile is 10-30 cm from the floor, and the upper one touches the corner for the ceiling plinth. The battens of the lathing (guides) should be fixed after the alignment and marking of the wall is made at a level of 50-60 cm from each other.
Note! In rooms with high humidity it is better to use galvanized profiles.
If the walls have not been aligned in advance so that there are no distortions and curvatures, small pieces of wood can be attached to the rail in places where the walls have chips and irregularities. For fastening the profile, self-tapping screws and screws are needed.
First, take the profile and attach it to the wall, measure the attachment points with a level. In these places, make holes in which to put the dowels, and then the profile, and tighten the screws.

The use of components for the installation of PVC panels
Installation of PVC panels begins with the creation of boxes on the walls. For this, markings are made on the walls. After that, the wooden battens are attached to the wall with screws or dowels. For the correct installation of rails, a level is used.
Next, the installation of the plates themselves towards the opening begins. The first is the inner corner, after which the panel is inserted. The rest of the fastening continues on the principle of "tenon groove".
When mounting sheets, some rules should be considered:
- the vertical position of the very first panel must be measured with a level, because the installation of the rest of the material depends on its correct and even fastening,
- during installation, the plates should be sealed together so that they better fit together,
- if it becomes necessary to cut off the excess part of the PVC panel, use a saw with small cloves.
The final plate is included in the corner or can be replaced with a plastic end piece.

As a result, you can’t even find fittings quickly.
All work ends with the installation of other components for the panels, namely the skirting board for the ceiling and floor. This is done to close the joint of the plate and the surface of the walls.
The installation process for PVC plastic panels and their components is straightforward. You only need to know where and when to use profiles for PVC panels. As a result, you get a flat surface with a beautiful view.
Step 3: attaching the first panel
If the sheets are mounted vertically, then the length of the sheet will be the height of the room; if horizontal, the width of the walls. Measure the required length using a tape measure and mark on a sheet lying on a flat floor. It is most convenient to cut the material with a hacksaw or a jigsaw.
In order to start lining, you will need a perforated metal corner, which is placed on the first panel and fastened to the wall. Then the panel comb is placed in a corner. Make sure that the panel enters the corner so that there are no distortions.


Next, you will need clippers (specially designed for the panels, metal staples that hold them together). At its base there are sharp burrs that are placed in the profile and on the panel, thereby providing excellent fastening to the next sheet.

Step 4: placing the following panels in the groove
Next, the panels are mounted at an angle. It is important that there are no gaps between the sheets. To avoid damage, you can take a wooden block and apply it to the panel along the entire length, then, clicking on the comb, place it in the groove of the first panel. Press the comb at the same time gently and tightly so that the sheet is fixed in the groove. The panel is attached to the profile with a klemer.

Step 5: how to install the last panel
To install the last panel, as for the first, use the corner "P". It is placed in the corner between the walls and first the sheet is attached to the corner, and then to the previous panel. The wall is sheathed!

The video shows how to attach PVC panels to walls so that the work has an excellent result.
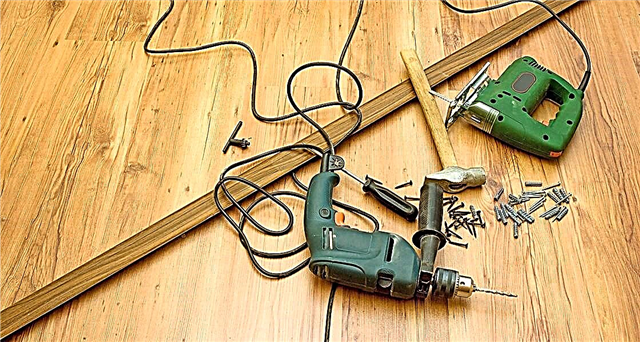
What to prepare from the tools?
Installation begins with the preparation of tools and materials. Get the PVC panels of the right color, calculating the required amount depending on the size of the room. Among the tools, prepare the following:
- Screwdriver.
- Building level. Preferably, its length exceeds 1 meter.
- Hammer drill. As an alternative, a hammer drill is allowed, but installation will be complicated.
- Suspensions for creating a frame.
- Profile for galvanized metal frame or wooden blocks.
- Elements of fasteners, which are represented by self-tapping screws, dowels with a plastic sleeve.
- The square.
If all this is available in your home, feel free to proceed with the installation.
Purpose of accessories for plastic panels
PVC wall and ceiling panels are a functional and durable coating, it is represented by a large palette of colors, has a different texture and is ideal for decorative decoration of living rooms. Sheets are made from a polymer mixture using special equipment - plasticizing machines or extruders. Cut lamellas are painted with organic dyes, and on top of the canvas are coated with antistatic and protective varnish - this is why the material looks good and has high performance.
However, for installation it is not enough to choose a perfect plastic coating - you will need to purchase accessories and fasteners, which are currently not just a set of individual parts, but also a multifunctional and technological mechanism that performs different tasks.
Purpose of components for PVC assembly:
- fixing panels to the ceiling, walls and flooring,
- connection of trim segments having different thicknesses,
- design and connection of joints at different angles,
- the formation of structures of any scale and form.
The main material for the production of accessories is high-quality steel, although some parts can be made of alloys based on magnesium, titanium, and aluminum, processed by pressure. Polymer elements are used more for decorative framing than for creating a durable crate.
A characteristic feature of the profiles used is ease of use - they are easy to adjust to the required dimensions, cutting off with an ordinary, construction knife. External molding in some cases is better to fix using adhesive compounds, thanks to this, the panels are not subject to damage and deformation.

Fixing elements for plastic
The method of installation of PVC panels, that is, their attachment to the walls and ceiling, depends on the characteristics of the room - the humidity level, the curvature of the working surfaces, the availability of communications and temperature bridges. In each case, certain fasteners are used, which will be discussed.
Three methods of fixation are distinguished.
- The most inexpensive and easiest way to fix plastic is silicone glue or “liquid nails”. You need to choose a special heat-resistant type of product. Silicone dries quickly, has high strength, and allows assembling panels in a short time, however, it can be used with a perfectly flat wall surface, moreover, during repair, this method does not allow replacing a damaged PVC lamella.


- When constructing a frame for plastic sheathing, fasteners such as dowels or nails are most often required - it all depends on the material of the walls and ceiling. PVC panels have special tabs on their surface, located under the grooves, and they are fixed. Based on the fact that the crate is usually made of wooden blocks, fix them with dowels with polymer sleeves. In this case, you can additionally use "liquid nails." This method has its drawbacks - the construction of a wood frame is associated with sawing a bar and coating it with antiseptic agents, and this takes a lot of time.

- Kleimers occupy a special place in the installation. They are different in size, but, as a rule, no more than 50 mm. These are special mounting plates in the form of braces made of galvanized iron, have a fastening tab and holes for nails and dowels. Usually these parts are included in the kit for the crate. The mounting clip snaps into the groove of the plank in one motion, so that using it can dispense with self-tapping screws and nails, since such a mount is absolutely reliable.


Kleimers are universal parts, unlike nails, they do not damage the joints and locks of panels, fit snugly to the surface and ensure high build quality. Despite the strength of fastening with brackets, there are minimal curvatures that enable wall subsidence with the integrity of the panels.
Of course, against the background of other fasteners, mounting clips are preferable, most importantly, when choosing, pay attention to the presence of a high-quality connection of the spikes and grooves on the parts.